The Tinnes/Cupery
High-Tech Epoxy/Paper Paper Canoe
 There have been several inquiries about the paper/epoxy canoe mentioned in a previous Paper Boater. The canoe in question was built several years ago by a friend here in Rochester, with your editor assisting. A detailed description follows.
This canoe was begun as somewhat of a lark. We had heard of paper canoes and wondered what could be done with this material. We had a 16 foot Abenaki stripper under construction, and the paper-fancy hit us just as we were finishing the outside of the hull. The partially finished canoe sat there looking an awful lot like a mold for a paper canoe.
A few test panels of paper & glue lead us to settle on brown wrapping paper and Weldwood Plastic Resin glue as the basic materials. A trip to a local paper supply store yielded a large roll of brown paper which was reduced into 4" & 6" wide rolls on a friend's band saw band saw.
We began by laying a plastic drop cloth over the hull to protect it and then began laying a diagonal layer of paper over the hull, overlapping slightly as dictated by the shape of the canoe hull. There was clearly a shrinkage problem as the paper dried, so we stapled the paper to another strip of wood attached to the canoe forms about 3" below the gunwales. The shrinkage wanted to pull the hull out of shape, (i.e. warp it as it shrank along the direction of the strip,) so we took care to balance the directions, (45 deg. one way, then 45 deg. the other.) After the first diagonal layers we switched to a crosswise & then lengthwise combination.
The glue was a little hard to mix smoothly and spreading it was a pain. We used a very small paint roller (about 4" wide & 1" diameter) but still had trouble. One reason we realized later was that the paper was sucking up much of the moisture in the glue. Hence we mixed it with more water than specified.
After about four layers the hull still seemed too "wimpy" and we thought about stiffening material that might be used. One of us was familiar with Clarkfoam, a material used by aircraft builders for composite construction, so an order to a home aircraft builder's supply house yielded some 1/4" and 1/2" sheets. Clarkfoam is stiffer than foam rubber but more pliable than styrofoam, so a 1/4" sheet, properly scored, could be coaxed to run from gunwale to gunwale along the center 4 feet of the canoe. Using strap clamps (& a lot of rope substituting for strap clamps) we glued the foam in place with an epoxy/microbead putty. We also cut two triangles for the floor area that ran about 4 feet towards bow & stern. Epoxy putty (and a lot of sanding) was used to make a smooth transition from the 1/4" foam to the paper hull. Four more layers of paper finished the papering.
We had sort of ignored the stem & stern to this point, intending to finish
 them later. Later was now. We laminated several layers of foam into 2" thick panels from which we cut stems and sterns. The paper was slit at the bow and stern, trimmed back slightly and fit into the sides of the plastic. Thus the leading & trailing edges of the canoe are really plastic (offending true paper canoeists I suppose, but then a lot of the above has already offended them.)
We had so much time invested in the job at this point, that we wanted some extra insurance and put a glass(4 oz)/epoxy layer inside and out. We wanted the additional waterproofing and the glass would also give skuff resistance, (and anyway we had more than enough materials on hand to do the job.)
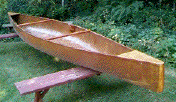
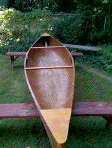
Two cedar strips were glued on each side as the gunwales and then the paper was trimmed flush. Closet rod (as obtained from your local home supply store) served nicely as thwarts and some scraps of 1/8" marine plywood was used for short decks fore and aft. A coat of satin varnish finished the job and made some of our less than perfect workmanship less obvious. It also allowed the rich natural patina of brown wrapping paper to shine through. The completed craft weighed in at 28 lbs.
The canoe has been surprisingly durable. It has been used on weekend camping trips and day excursions for about 5 years. During this time it has not really suffered from water penetration, but has sustained puncture wounds through the glass and into the foam. The areas without foam have a sort of "leathery" quality and seem immune to this sort of thing.
Were we doing it again, we'd investigate pre-moistening the paper so it didn't suck up so much glue, and/or find a better way of dispensing the glue. We'd stick to the 4" strips as they seemed to fit to the mold better than the wider ones. We might also look for a core material that didn't crush so easily. Perhaps a thin balsa or wood material. We were pleased with the general effect of the stiffening material, however, as it eliminated the need to add floorboards or ribs.